
Non-destructive Testing of Hydraulic Fracturing Components
- Thomas R. Hay, Ph.D., P.E
- Sep 19, 2018
- 4 min read
Flow iron is used in hydraulic fracturing and flowback operations. This process is also referred to fracking. Flow iron requires periodic non-destructive testing to assure fitness-for-service. Non-destructive testing methods include ultrasonic thickness testing, phased array testing, radiographic testing, magnetic particle testing and visual testing. This article focuses in particular on magnetic particle testing of flow iron male and female sub ends.
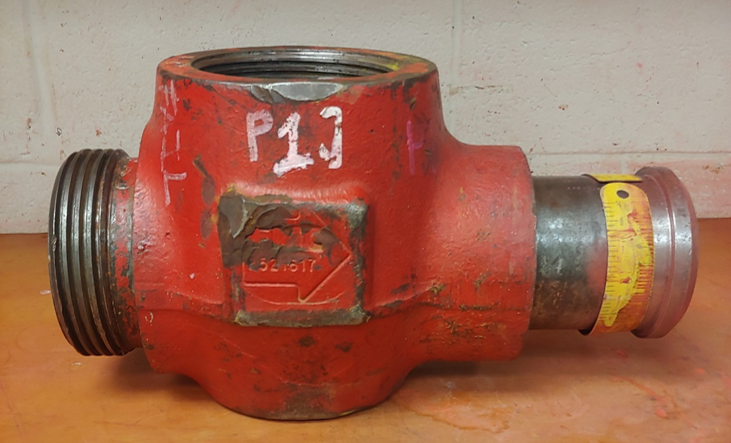
Shown above is a top entry FMC 3” 1502 check valve. Some recommended service options are high pressure well servicing lines, fracturing lines, testing lines, cementing and circulating lines, and other well service and stimulation applications. A check valve is a mechanical device that permits fluid to flow or pressure to act in one direction only. Check valves are used in a variety of oil and gas industry applications as control or safety devices. Check valve designs are tailored to specific fluid types and operating conditions. Some designs are less tolerant of debris, while others may obstruct the bore of the conduit or tubing in which the check valve is fitted. These assets require periodic non-destructive testing which includes hydrostatic pressure testing to 15,000 PSI, visual inspection, ultrasonic thickness testing, and magnetic particle testing. Dimensional gaging may be required in some special circumstances. When you are inspecting check valves focus on any areas on the threaded female side that are dinged or nicked because cracks tend to form behind those places. On the male sub side be sure to focus behind the lip because when the wing is tightened it tends to create cracks along the circumference.
Shown above is a cracked male sub end of a top entry FMC 3” 1502 standard service check valve. It was inspected using wet fluorescent magnetic particle testing – a common non-destructive testing technique. Wet fluorescent magnetic particle testing allows for greater contrast between the test surface and the crack using a UV-A inspection flashlight.
In order to perform the magnetic particle inspection correctly you need to follow a few steps to ensure reliable results. The first step is to ensure proper particle concentration of the wet fluorescent magnetic particle solution. In order to achieve this, you need to follow Magnaflux’s manufacture recommendations for mixing their Magnaglo 14A Redi-Bath water based fluorescent magnetic particle concentrate. Once the solution is mixed, 100 milliliters needs to be poured into a centrifuge to ensure proper particle concentration. The solution should be given an hour to settle. Once settled, a proper concentration of between 0.2-0.4 cubic centimeters of fluorescent magnetic particles needs to be identified. Next, you need to ensure your UV-A inspection light is working properly. In order to do this, you must take your OPTI-LUX 365 UV-A inspection flashlight and test it against SPECTROLINE’s AccuMAX XRP-3000 Radiometer/Photometer to test the UV-A light intensity. The reading needs to be over 1000 µW/cm2 at 15 inches in order to proceed with the magnetic particle inspection. Now that the calibration of your instruments is complete, you may proceed with the magnetic particle testing of the FMC 3” 1502 check valve.
The FMC 3” 1502 check valve was tested on the male side first. While inspecting you must look for both longitudinal and transverse cracks. Once an indication is detected, align your yoke so the magnetic field aligns perpendicularly with the crack in order to get the strongest indication. Utilizing all these techniques properly, you should be able to successfully find a 4 centimeter crack on the male sub end of a FMC 3” 1502 check valve.

Shown above is a cracked male sub end of a top entry FMC 3” 1502 standard service check valve. It was inspected using white contrast wet fluorescent magnetic particle testing. White contrast wet fluorescent magnetic particle testing allows for greater contrast between the test surface and the crack without using a UV-A inspection flashlight.
In order to perform the magnetic particle inspection correctly you must follow a few steps to ensure reliable results. The first step is to ensure that the Magnaflux’s Magnavis 7HF prepared bath and WCP-2 white contrast paint is not expired. Once this is confirmed, you may continue with the magnetic particle inspection.
The FMC 3” 1502 check valve should be tested on the male sub side first. To accomplish this, spray down the Magnaflux’s Magnavis WCP-2 to create a contrast between the magnetic particles and the test piece. Once the WCP-2 dries on the test piece use your yoke to look for both longitudinal and transverse cracks while simultaneously spraying Magnaflux’s Magnavis 7HF prepared bath on the test piece. Once an indication is found, he align your yoke so the magnetic field aligns perpendicularly with the crack in order to get the strongest indication. Utilizing all these techniques properly, you should be able to successfully find a 5.5 centimeter crack on the male sub end of a FMC 3” 1502 check valve.

Shown above is a cracked male sub end of a top entry FMC 3” 1502 standard service check valve. It was inspected using Red Dual Light wet magnetic particle testing. Red Dual Light wet magnetic particle testing allows for greater contrast between the test surface and the crack with or without using a UV-A inspection flashlight.
In order to perform the magnetic particle inspection correctly you need to follow a few steps to ensure reliable results. The first step that needs to be done is to ensure your Circle Systems. Inc’ Circlesafe 850A Red Dual Light Particles is not expired. Once you confirm it is not expired, you may continue with the magnetic particle testing.
The top entry FMC 3” 1502 check valve was tested on the male sub side first. Unlike the white contrast method, Red Dual Light does not need a white contrast sprayed on the test piece. For the magnetic particle inspection you must use your yoke to look for both longitudinal and transverse cracks while simultaneously spraying Circle Systems. Inc’ Circlesafe 850A Red Dual Light Particles on the test piece. Once an indication is found, align your yoke so the magnetic field aligns perpendicularly with the crack in order to get the strongest indication. Utilizing all these techniques properly, you should be able to successfully find a 3.5 centimeter crack on the male sub end of a FMC 3” 1502 check valve.
White contrast MT provided the most accurate and reliable results. However, wet fluorescent MT provided comparable results. The red dual light particle method found the indication, however it proved the most difficult method at detecting the crack.

Comments